Hunt The Dragons: Difference between revisions
Imported from Hunt_The_Dragons |
No edit summary |
||
| (One intermediate revision by the same user not shown) | |||
| Line 1: | Line 1: | ||
== Hunt the Dragons == | == Hunt the Dragons == | ||
The legendary battlefield has been completely reimagined! The PvP Square returns with a new theme, renewed visuals, and brand-new mechanics that will transform how you face the most intense battles in RealMU. Get ready for an even more challenging war scenario, where strategy, power, and teamwork are the keys to achieving glory. | |||
== PvP Square == | == PvP Square == | ||
[[ | [[File:168bf2e7a67515.png|thumbnail]] | ||
In the new version of PvP Square, the Safe-Zone also | |||
includes a PvP combat area. | |||
In addition, the map has 4 strategic portals | |||
located at the highlighted points: | |||
# Zone A | |||
# Zone B | |||
# Zone C | |||
# Zone D | |||
These portals teleport players to key areas of the battlefield, allowing quick movement and creating strategic opportunities during combat. | |||
== | === Battlefield === | ||
[[ | [[File:168bf317c64a19.png|thumbnail]] | ||
The battlefield has been completely revamped and now features a brand-new strategic mechanic: | |||
* Main Points (A, B, C, and D) → These are the map’s safe zones that serve as support and initial movement points. | |||
* Strategic Portals → There are 4 portals (2 blue and 2 red). Each pair of the same color is interconnected, allowing players to instantly teleport from one side to the other. This mechanic opens space for stealth tactics and area control. | |||
* Intermediate Areas (1, 2, 3, and 4) → In these points, the Nightflame Dragons will appear, dropping Charms — temporary items that grant PvP advantages. | |||
* Central Area → The most contested area of the map. This is where the Apocalypse Dragon, the final boss, will appear after the Nightflame Dragons are defeated. | |||
== Nightflame Dragons == | |||
[[File:168bf33c6947ea.png|thumbnail]] | |||
The Nightflame Dragons emerge as the first major threat in the new PvP Square. | |||
* | Make no mistake: although they are considered the “mini-bosses” of the battlefield, these dragons carry the soul of an Elite monster, capable of unleashing devastating debuffs and brutal attacks that can surprise even the most experienced warriors. | ||
* | |||
* | * They will spawn in the four main points of the map '''(Areas 1, 2, 3, and 4)'''. | ||
* | * In each area, 6 waves of Nightflame Dragons will appear — each wave containing 2 monsters — spawning every 2 minutes until the arrival of the Apocalypse Dragon. | ||
* | * When defeated, these monsters will drop one of the new Charms, temporary items that grant powerful effects capable of changing the course of battles. – Only players who land the killing blow on a Nightflame Dragon can collect the Charm it drops (last hit). | ||
* These Charms will be essential not only to face rivals but also to confront the supreme threat at the center: the Apocalypse Dragon. | |||
* Additionally, each Nightflame Dragon has a 25% chance to drop '''X1 [B] Temple Guard Reinforcement Stone'''. | |||
== PvP Charms == | == PvP Charms == | ||
The war in PvP Square reaches a new level with the arrival of Charms — temporary artifacts that contain the power of the Nightflame Dragons. Each Charm carries unique energy and, when activated, can completely change the outcome of a battle. | |||
{| class="wikitable" style="width:70%; text-align:left; background-color:#0b1d0b; color:#fff; border:1px solid #1a3a1a;" | {| class="wikitable" style="width:70%; text-align:left; background-color:#0b1d0b; color:#fff; border:1px solid #1a3a1a;" | ||
! style="width:80px; text-align:center;" | | ! style="width:80px; text-align:center;" | Image | ||
! | ! Name and Description | ||
|- | |- | ||
| [[File:168bf36952c6f7.png|60px|center]] | | [[File:168bf36952c6f7.png|60px|center]] | ||
| '''Charm of Judgement'''<br>3% | | '''Charm of Judgement'''<br>3% chance to apply ''Stun'' to the enemy for 5 seconds. | ||
|- | |- | ||
| [[File:168bf5f59c979e.png|60px|center]] | | [[File:168bf5f59c979e.png|60px|center]] | ||
| '''Charm of Celestial Wing'''<br>3% | | '''Charm of Celestial Wing'''<br>3% chance to reduce the target's ''Attack Speed'' by half for 5 seconds. | ||
|- | |- | ||
| [[File:168bf5bb8c7925.png|60px|center]] | | [[File:168bf5bb8c7925.png|60px|center]] | ||
| '''Charm of the Emerald Guardian'''<br>3% | | '''Charm of the Emerald Guardian'''<br>3% chance to ''Freeze'' the enemy for 5 seconds. | ||
|- | |- | ||
| [[File:168bf5bea0ea35.png|60px|center]] | | [[File:168bf5bea0ea35.png|60px|center]] | ||
| '''Charm of Infernal Core'''<br> | | '''Charm of Infernal Core'''<br>Increases vitality, raising maximum HP by 5000. | ||
|- | |- | ||
| [[File:168bf5bfc96032.png|60px|center]] | | [[File:168bf5bfc96032.png|60px|center]] | ||
| '''Charm of Sacred Aegis'''<br> | | '''Charm of Sacred Aegis'''<br>Grants full immunity against ''Double Damage''. | ||
|- | |- | ||
| [[File:168bf5c470928d.png|60px|center]] | | [[File:168bf5c470928d.png|60px|center]] | ||
| '''Charm of Venom Crest'''<br>3% | | '''Charm of Venom Crest'''<br>3% chance to '''Blind''' the enemy when attacked, nullifying their attack accuracy. | ||
|- | |- | ||
| [[File:168bf5c4d0a62f.png|60px|center]] | | [[File:168bf5c4d0a62f.png|60px|center]] | ||
| '''Charm of the Golden Sentinel'''<br> | | '''Charm of the Golden Sentinel'''<br>3% chance to become invincible when attacked. | ||
|- | |- | ||
| [[File:168bf5c543f91f.png|60px|center]] | | [[File:168bf5c543f91f.png|60px|center]] | ||
| '''Charm of the Sun Relic'''<br> | | '''Charm of the Sun Relic'''<br>5% chance to Ignore the enemy's Defense. | ||
|- | |- | ||
| [[File:168bf5f61b3803.png|60px|center]] | | [[File:168bf5f61b3803.png|60px|center]] | ||
| '''Charm of the Solar Sigil'''<br> | | '''Charm of the Solar Sigil'''<br>Grants full immunity against Excellent Damage. | ||
|- | |- | ||
| [[File:168bf5f64d7070.png|60px|center]] | | [[File:168bf5f64d7070.png|60px|center]] | ||
| '''Charm of the Eternal Spiral'''<br> | | '''Charm of the Eternal Spiral'''<br>Grants full immunity against Critical Damage. | ||
|} | |} | ||
The PvP Charms will last only 10 minutes after being collected. After this period, the item can no longer be used, leaving only the option to sell it to the NPC. | |||
== Apocalypse Dragon == | == Apocalypse Dragon == | ||
At the center of PvP Square, after the fall of the Nightflame Dragons, rises the supreme enemy: the Apocalypse Dragon. This colossal boss is the embodiment of chaos and will bring the most intense battle ever seen in RealMU, with devastating abilities and deadly debuffs — beware! | |||
==== | ==== Battle Mechanics ==== | ||
[[ | [[File:168bf61d9c6362.png|thumbnail]] | ||
* | * Spawns at the center of the map after all Nightflame Dragons are defeated. | ||
* | * Has massive area attacks, debuffs, and high resistance. | ||
* | * Forces guilds and parties to either unite or fight fiercely to claim victory. | ||
The Apocalypse Dragon will require strategy, preparation, and intelligent use of Charms to be defeated. But its fall will reward the bravest warriors with unique rewards. | |||
== Rewards == | == Rewards == | ||
When defeated, the Apocalypse Dragon will drop a large amount of valuable items directly on the battlefield, creating fierce competition among survivors. | |||
But the fate of victory holds a surprise: the boss drops are divided into sessions, and only one random session will activate with each defeat of the dragon. This means that every battle against the Apocalypse Dragon will be unique and unpredictable. | |||
{| class="wikitable" style="width:100%; background-color:#0b1d0b; color:#fff; border:1px solid #1a3a1a; text-align:left;" | {| class="wikitable" style="width:100%; background-color:#0b1d0b; color:#fff; border:1px solid #1a3a1a; text-align:left;" | ||
|- | |- | ||
! style="width:25%; text-align:center;" | | ! style="width:25%; text-align:center;" | Rewards: Session 1<br>(24%) | ||
! style="text-align:left;" | | ! style="text-align:left;" | | ||
'''Drop | '''Main Drop:'''<br> | ||
* x100 Guardian Enhanced Stone | * x100 Guardian Enhanced Stone | ||
* x100 Jewel of Bless | * x100 Jewel of Bless | ||
'''Drop | '''Bonus Drop:'''<br> | ||
* x10 [B] Temple Guard Reinforcement Stone | * x10 [B] Temple Guard Reinforcement Stone | ||
* x8 Mysterious Stone | * x8 Mysterious Stone | ||
* | * Cursed Ticket (used for Demon Hunter's Box) | ||
* x2 Excellent-Socket Necklace (2~3 Opt/Skt) | * x2 Excellent-Socket Necklace (2~3 Opt/Skt) | ||
* x2 Ring & Necklace PvP (2~5 Exc options) | * x2 Ring & Necklace PvP (2~5 Exc options) | ||
|- | |- | ||
! style="width:25%; text-align:center;" | | ! style="width:25%; text-align:center;" | Rewards: Session 2<br>(24%) | ||
! style="text-align:left;" | | ! style="text-align:left;" | | ||
'''Drop | '''Main Drop:'''<br> | ||
* x100 Ability Crystal | * x100 Ability Crystal | ||
* x100 Golden Sentence | * x100 Golden Sentence | ||
'''Drop | '''Bonus Drop:'''<br> | ||
* x10 [B] Temple Guard Reinforcement Stone | * x10 [B] Temple Guard Reinforcement Stone | ||
* x8 Mysterious Stone | * x8 Mysterious Stone | ||
* | * Cursed Ticket (used for Demon Hunter's Box) | ||
* x2 Excellent-Socket Necklace (2~3 Opt/Skt) | * x2 Excellent-Socket Necklace (2~3 Opt/Skt) | ||
* x2 Ring & Necklace PvP (2~5 Exc options) | * x2 Ring & Necklace PvP (2~5 Exc options) | ||
|- | |- | ||
! style="width:25%; text-align:center;" | | ! style="width:25%; text-align:center;" | Rewards: Session 3<br>(24%) | ||
! style="text-align:left;" | | ! style="text-align:left;" | | ||
'''Drop | '''Main Drop:'''<br> | ||
* x100 Artifact Enchantment Stone | * x100 Artifact Enchantment Stone | ||
* x100 Jewel of Creation | * x100 Jewel of Creation | ||
'''Drop | '''Bonus Drop:'''<br> | ||
* x10 [B] Temple Guard Reinforcement Stone | * x10 [B] Temple Guard Reinforcement Stone | ||
* x8 Mysterious Stone | * x8 Mysterious Stone | ||
* | * Cursed Ticket (used for Demon Hunter's Box) | ||
* x2 Excellent-Socket Necklace (2~3 Opt/Skt) | * x2 Excellent-Socket Necklace (2~3 Opt/Skt) | ||
* x2 Ring & Necklace PvP (2~5 Exc options) | * x2 Ring & Necklace PvP (2~5 Exc options) | ||
|- | |- | ||
! style="width:25%; text-align:center;" | | ! style="width:25%; text-align:center;" | Rewards: Session 4<br>(24%) | ||
! style="text-align:left;" | | ! style="text-align:left;" | | ||
'''Drop | '''Main Drop:'''<br> | ||
* x100 Legendary Stone | * x100 Legendary Stone | ||
* x100 Jewel of Harmony | * x100 Jewel of Harmony | ||
'''Drop | '''Bonus Drop:'''<br> | ||
* x10 [B] Temple Guard Reinforcement Stone | * x10 [B] Temple Guard Reinforcement Stone | ||
* x8 Mysterious Stone | * x8 Mysterious Stone | ||
* | * Cursed Ticket (used for Demon Hunter's Box) | ||
* x2 Excellent-Socket Necklace (2~3 Opt/Skt) | * x2 Excellent-Socket Necklace (2~3 Opt/Skt) | ||
* x2 Ring & Necklace PvP (2~5 Exc options) | * x2 Ring & Necklace PvP (2~5 Exc options) | ||
|- | |- | ||
! style="width:25%; text-align:center;" | | ! style="width:25%; text-align:center;" | Rewards: Session 5<br>(4%) | ||
! style="text-align:left;" | | ! style="text-align:left;" | | ||
'''Drop | '''Main Drop:'''<br> | ||
* x1 Golden Ticket | * x1 Golden Ticket | ||
'''Drop | '''Bonus Drop:'''<br> | ||
* x10 [B] Temple Guard Reinforcement Stone | * x10 [B] Temple Guard Reinforcement Stone | ||
* x8 Mysterious Stone | * x8 Mysterious Stone | ||
* | * Cursed Ticket (used for Demon Hunter's Box) | ||
* x2 Excellent-Socket Necklace (2~3 Opt/Skt) | * x2 Excellent-Socket Necklace (2~3 Opt/Skt) | ||
* x2 Ring & Necklace PvP (2~5 Exc options) | * x2 Ring & Necklace PvP (2~5 Exc options) | ||
| Line 166: | Line 166: | ||
|} | |} | ||
== | == Schedule and Frequency == | ||
The event will occur at least twice a day, according to the schedule below. | |||
{| class="wikitable" style="width:50%; text-align:center; background-color:#0b1d0b; color:#fff; border:1px solid #1a3a1a;" | {| class="wikitable" style="width:50%; text-align:center; background-color:#0b1d0b; color:#fff; border:1px solid #1a3a1a;" | ||
! style="width:50%;" | ''' | ! style="width:50%;" | '''DAY OF THE WEEK''' | ||
! style="width:50%;" | ''' | ! style="width:50%;" | '''TIME (UTC -3)''' | ||
|- | |- | ||
| | | Monday | ||
| » 02:00<br>» 15:00 | | » 02:00<br>» 15:00 | ||
|- | |- | ||
| | | Tuesday | ||
| » 10:00<br>» 22:00 | | » 10:00<br>» 22:00 | ||
|- | |- | ||
| | | Wednesday | ||
| » 08:00<br>» 20:00 | | » 08:00<br>» 20:00 | ||
|- | |- | ||
| | | Thursday | ||
| » 13:00<br>» 23:00 | | » 13:00<br>» 23:00 | ||
|- | |- | ||
| | | Friday | ||
| » 04:00<br>» 20:00 | | » 04:00<br>» 20:00 | ||
|- | |- | ||
| | | Saturday | ||
| » 05:00<br>» 14:00<br>» 23:00 | | » 05:00<br>» 14:00<br>» 23:00 | ||
|- | |- | ||
| | | Sunday | ||
| » 08:00<br>» 18:00<br>» 22:00 | | » 08:00<br>» 18:00<br>» 22:00 | ||
|} | |} | ||
Latest revision as of 21:56, 17 January 2026
Hunt the Dragons
[edit]The legendary battlefield has been completely reimagined! The PvP Square returns with a new theme, renewed visuals, and brand-new mechanics that will transform how you face the most intense battles in RealMU. Get ready for an even more challenging war scenario, where strategy, power, and teamwork are the keys to achieving glory.
PvP Square
[edit]
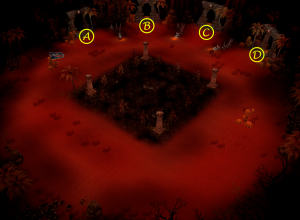
In the new version of PvP Square, the Safe-Zone also includes a PvP combat area.
In addition, the map has 4 strategic portals located at the highlighted points:
- Zone A
- Zone B
- Zone C
- Zone D
These portals teleport players to key areas of the battlefield, allowing quick movement and creating strategic opportunities during combat.
Battlefield
[edit]
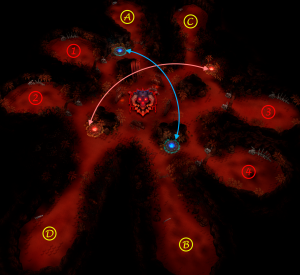
The battlefield has been completely revamped and now features a brand-new strategic mechanic:
- Main Points (A, B, C, and D) → These are the map’s safe zones that serve as support and initial movement points.
- Strategic Portals → There are 4 portals (2 blue and 2 red). Each pair of the same color is interconnected, allowing players to instantly teleport from one side to the other. This mechanic opens space for stealth tactics and area control.
- Intermediate Areas (1, 2, 3, and 4) → In these points, the Nightflame Dragons will appear, dropping Charms — temporary items that grant PvP advantages.
- Central Area → The most contested area of the map. This is where the Apocalypse Dragon, the final boss, will appear after the Nightflame Dragons are defeated.
Nightflame Dragons
[edit]
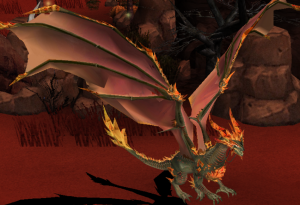
The Nightflame Dragons emerge as the first major threat in the new PvP Square.
Make no mistake: although they are considered the “mini-bosses” of the battlefield, these dragons carry the soul of an Elite monster, capable of unleashing devastating debuffs and brutal attacks that can surprise even the most experienced warriors.
- They will spawn in the four main points of the map (Areas 1, 2, 3, and 4).
- In each area, 6 waves of Nightflame Dragons will appear — each wave containing 2 monsters — spawning every 2 minutes until the arrival of the Apocalypse Dragon.
- When defeated, these monsters will drop one of the new Charms, temporary items that grant powerful effects capable of changing the course of battles. – Only players who land the killing blow on a Nightflame Dragon can collect the Charm it drops (last hit).
- These Charms will be essential not only to face rivals but also to confront the supreme threat at the center: the Apocalypse Dragon.
- Additionally, each Nightflame Dragon has a 25% chance to drop X1 [B] Temple Guard Reinforcement Stone.
PvP Charms
[edit]The war in PvP Square reaches a new level with the arrival of Charms — temporary artifacts that contain the power of the Nightflame Dragons. Each Charm carries unique energy and, when activated, can completely change the outcome of a battle.
The PvP Charms will last only 10 minutes after being collected. After this period, the item can no longer be used, leaving only the option to sell it to the NPC.
Apocalypse Dragon
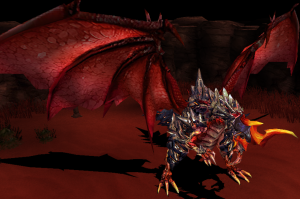
[edit]At the center of PvP Square, after the fall of the Nightflame Dragons, rises the supreme enemy: the Apocalypse Dragon. This colossal boss is the embodiment of chaos and will bring the most intense battle ever seen in RealMU, with devastating abilities and deadly debuffs — beware!
Battle Mechanics
[edit]
- Spawns at the center of the map after all Nightflame Dragons are defeated.
- Has massive area attacks, debuffs, and high resistance.
- Forces guilds and parties to either unite or fight fiercely to claim victory.
The Apocalypse Dragon will require strategy, preparation, and intelligent use of Charms to be defeated. But its fall will reward the bravest warriors with unique rewards.
Rewards
[edit]When defeated, the Apocalypse Dragon will drop a large amount of valuable items directly on the battlefield, creating fierce competition among survivors.
But the fate of victory holds a surprise: the boss drops are divided into sessions, and only one random session will activate with each defeat of the dragon. This means that every battle against the Apocalypse Dragon will be unique and unpredictable.
| Rewards: Session 1 (24%) |
Main Drop:
Bonus Drop:
|
|---|---|
| Rewards: Session 2 (24%) |
Main Drop:
Bonus Drop:
|
| Rewards: Session 3 (24%) |
Main Drop:
Bonus Drop:
|
| Rewards: Session 4 (24%) |
Main Drop:
Bonus Drop:
|
| Rewards: Session 5 (4%) |
Main Drop:
Bonus Drop:
|
Schedule and Frequency
[edit]The event will occur at least twice a day, according to the schedule below.
| DAY OF THE WEEK | TIME (UTC -3) |
|---|---|
| Monday | » 02:00 » 15:00 |
| Tuesday | » 10:00 » 22:00 |
| Wednesday | » 08:00 » 20:00 |
| Thursday | » 13:00 » 23:00 |
| Friday | » 04:00 » 20:00 |
| Saturday | » 05:00 » 14:00 » 23:00 |
| Sunday | » 08:00 » 18:00 » 22:00 |


